
Building a Programming Language
Programming languages are fascinating. But have you ever wondered how they work under the hood? As an academic exercise, I set out to build my own programming language hindilang, a Hindi inspired scripting language that transpiles to JavaScript!
If you want to dive straight into the code, check out the full source here: GitHub Repo 🔥
Disclaimer: I am not a subject expert in writing languages. I am just sharing my findings.
A Quick Taste of hindilang
hindilang provides fundamental programming constructs like printing, inputs, conditional, loops and comments (obviously with hindi flavour).
Here are some examples
- Variables and Printing
MANLO x = 5;
CHAPO x;

// Output
5
- Taking User Input
PUCHO y;
CHAPO y;

// (If user enters 10)
// Output is 10
- Conditional Statements (if)
MANLO x = 5;

AGAR (x > 3) {
    CHAPO "X bada hai!";
}

// Output
// X bada hai
- Loops (while)
MANLO x = 5;

JABTAK (x < 10) {
    CHAPO x;
    MANLO x = x + 1;
}

// Output
// 5
// 6
// 7
// 8
// 9
// 10
- Comments
# Yeh ek comment hai

//(Comments are ignored during execution)
Theoritical part
Well, we won’t get into much theory (if you’re interested checkout compiler series) but one thing that is quite practical and usefull is grammar. Its the rules we give to our language ( what comes after what).
This language follows a BNF-like grammar (Backus-Naur Form) to define its syntax. Here’s a simplified structure:
<program> ::= <statement_list>

<statement_list> ::= <statement> <newline> <statement_list>
                   | <statement> <newline>
                   | ε   (* Empty Line Allowed *)

<statement> ::= <assignment>
              | <print_statement>
              | <input_statement>
              | <if_statement>
              | <while_loop>

<assignment> ::= "MANLO" <identifier> "=" <expression> ";"

<print_statement> ::= "CHAPO" <expression> ";"

<input_statement> ::= "PUCHO" <identifier> ";"

<if_statement> ::= "AGAR" "(" <condition> ")" "{" <statement_list> "}"

<while_loop> ::= "JABTAK" "(" <condition> ")" "{" <statement_list> "}"
If you were unable to follow, thats completely fine. To sum it up, we make a mental model of what our programming language should look like !
How it works ? (The Broader Picture)
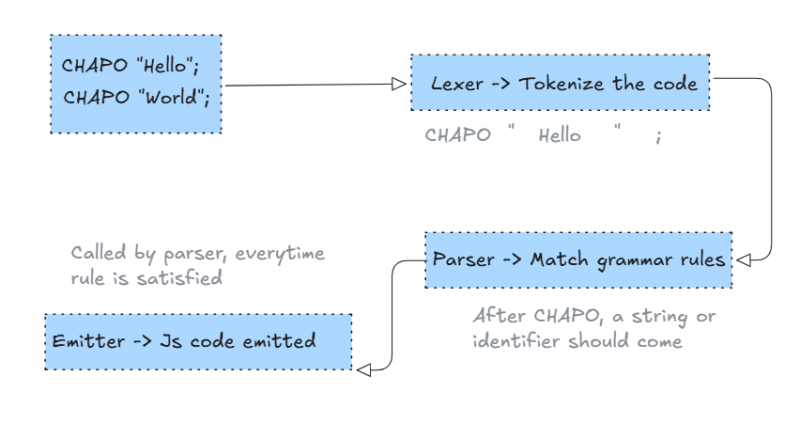
- Lexer → Tokenizes your code
- Parser → Matches grammar rules, decides meaning
- Emitter → Spits out JS code at each parser step
Understanding Code Flow with a Example 🚀
Lets take a simple example and see how everything works together.
Input
You start with source:
MANLO x = 5;
CHAPO x;
➔ Lexer Phase (Tokenization)
- Lexer has
this.source = "MANLO x = 5;\nCHAPO x;". - It moves char-by-char.
- Each time it recognizes something (e.g., a word, number, symbol), it creates a Token object:
| Source Text | Lexer Creates |
|---|---|
| MANLO | Token(text=MANLO, kind=MANLO) |
| x | Token(text=x, kind=IDENT) |
| = | Token(text==, kind=EQ) |
| 5 | Token(text=5, kind=NUMBER) |
| ; | Token(text=;, kind=SEMICOLON) |
| CHAPO | Token(text=CHAPO, kind=CHAPO) |
| x | Token(text=x, kind=IDENT) |
| ; | Token(text=;, kind=SEMICOLON) |
| EOF | Token(text=\0, kind=EOF) |
Lexer forgets after giving Token - it just reads forward.
➔ Parser Phase (Grammar + Logic)
- Parser calls
lexer.getToken()to get one Token at a time. - It uses
checkToken()andmatch()to enforce your language’s grammar (like MANLO must be followed by IDENT then a = so on. ). - If the tokens are not in correct order, Parser aborts with an error.
| Language Keyword | Parser Expectation |
|---|---|
| MANLO | Needs: IDENT then = then expression and then ; |
| CHAPO | Needs: STRING or IDENT then ; |
If you check the code (statement function), you’ll notice it follows a recursive descent parsing approach and supports LL(1) parsing, meaning it looks at only one token at a time without backtracking.
➔ Emitter Phase (Code Generation)
- While parsing, at the same time, Parser calls
emitter.emit()andemitter.emitLine()to generate the final JavaScript code. - It builds the output file line-by-line.
| Parser action | Emitter output |
|---|---|
| MANLO x = 5; | let x = 5; |
| CHAPO x; | console.log(x); |
Final JavaScript Output
let x = 5;
console.log(x);
Deeper Dive: What’s Next?
Right now, hindilang is a transpiler (converts one high-level language to another). But if we wanted to build a ✌true compiler✌ that generates machine code, we could explore:
- LLVM (Low-Level Virtual Machine) - A compiler framework that generates optimized machine code for multiple architectures.
hindilang → Lexer → Parser → LLVM IR → Machine Code (x86, ARM, etc.)
-
Direct Assembly Code Generation - Emit x86 assembly and use an assembler (like
nasm) to generate machine code. -
WebAssembly (WASM) – A low-level binary format that runs on modern browsers.
Conclusion: Seeing the Matrix 👀
I’d 100% recommend building your own programming language. It fundamentally changes how you see code.
Beyond learning about compiler internals, you gain something even more valuable:
- Programming is Abstraction
A high-level language is just a bunch of strings that the compiler accepts. The compiler dictates the language - it breaks it down, checks validity, and converts it to low-level code. Then the cycle repeats until we reach machine instructions.
- Errors? They Excite Me Now.
In hindilang, I didn’t even bother giving useful message. Debugging feels less like a headache and more like a feature. Wow, atleast the language tells me where mistake might be !
- The Better You Understand Your Language, The Better You Write.
Compilers don’t “think” they follow rules. The more you understand how they optimize (or struggle), the better you can write better code.
Now, every time I write code, I ask myself:
- What’s the compiler doing?
- How is it parsing this statement?
- How does this turn into machine instructions?
Thanks to Austin Henley for making this a possibility !